
There are a number of ways to reduce website loading time. It is a must to have a thing to optimize your website loading time to stay competitive. your website loading time directly affect your website SEO Ranking as Google made it clear that website load in less time will be listed higher in the search result. In this post, I will talk about how we can improve our website loading time with the help of CDN (Content Delivery Network).
What is the Content Delivery Network and Why it is important?
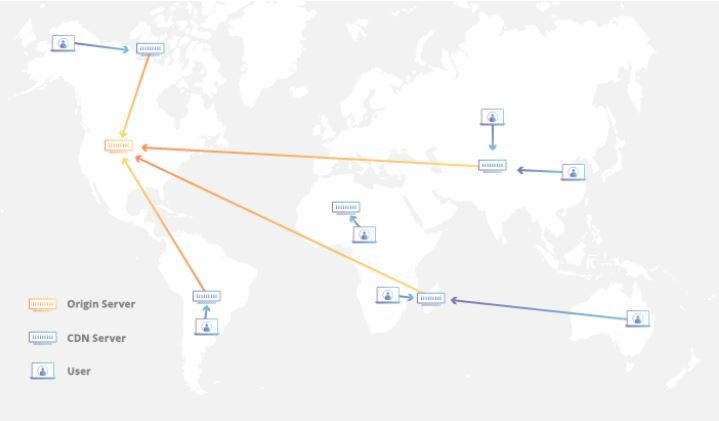
CDN is short for the content delivery network. A content delivery network (CDN) is a system of distributed servers (network) that deliver pages and other web content to a user, based on the geographic locations of the user, the origin of the webpage and the content delivery server.
How CDN Works?
To minimize the distance between the visitors and your website’s server, a CDN stores a cached version of its content in multiple geographical locations (a.k.a., points of presence, or PoPs). Each
What is Cloudflare CDN?

Cloudflare is a Content Delivery Network (CDN) that acts as a proxy between a website and the visitor. This system enables users to receive cached static content from the nearest servers. With shorter physical distance, the site can load faster. What’s great about Cloudflare is that it has one of the biggest server networks in the world. As such, no matter where your visitors are, Cloudflare will help you deliver the fastest website experience. This surely will help to improve your site’s SEO as speed is one of the ranking factors in search engines. Compared to traditional CDN, Cloudflare offers many other useful features:
- DDoS attack mitigation
- Analytics on all requests made to a website
- Easy SSL certificate installation
- Network gateway between protocols
How to Configure Cloudflare CDN with Your WordPress Website-:
Step 1: Creating a Cloudflare Account
Navigate to the Cloudflare website and click the Sign-Up button in order to create an account.

Step 2: Adding Domain Name to Cloudflare
Go to your Cloudflare dashboard. Select the +Add Site button below a notification that reads “You currently don’t have any websites.”Adding a website to CloudflareNow, select your plan. If it’s for a personal site, we recommend you to choose the free plan. Otherwise, choose the Pro or Business plan for business websites.
Step 3: Checking the DNS Records of Your Domain Name in Cloudflare
Once your WordPress site is added to Cloudflare, you’ll be prompted with the DNS details of your domain name. In this step, you can enable or disable Cloudflare for specific subdomains.To activate, simply toggle the cloud to orange.

Step 4: Pointing Your Domain Name to Cloudflare Nameservers
After activating Cloudflare for your domain and subdomains, you will be greeted with Cloudflare nameservers on the next page. Now, we need to replace your old nameservers with Cloudflare’s. Open a new browser tab and visit your hosting control panel. If you’re a Hostinger user, you can find the detail of your nameservers in the Domains tab. Replace the existing nameservers with those from Cloudflare. Don’t forget to click Update.
Go back to the Cloudflare page and press the Done, check nameservers button. Note that it may take up to 72 hours for DNS to propagate worldwide. Once the nameservers update has been completed, you will receive an email confirmation message from Cloudflare. Alternatively, you can also check status on Cloudflare website. During this process, your page will not face any downtime.
Thanks for reading…“Pardon my grammar, English is not my native tongue.”
If you like my work, Please Share on Social Media! You can Follow WP knol on Facebook, Twitter, Pinterest and YouTube for latest updates. You may Subscribe to WP Knol Newsletter to get latest updates via Email. You May also Continue Reading my Recent Posts Which Might Interest You.